In this assignment you are supposed to program you own HTTP server, also known as a web server.
Your will implement an HTTP server which implements a downscaled version of the original HTTP/1.0 protocol http://www.faqs.org/rfcs/rfc1945.html
However, your HTTP server will (although simple) work with ordinary browsers like Internet Explorer, Mozilla Firefox, Opera, etc.
The assignment is divided into a number of small steps. It is important that you try to complete step N before proceeding to step N + 1.
All code must be properly tested. You are free to write the test before or after the code. However, it is important that you write the test code during each step.
All code must be properly documented with /// comments.
You can use Git with a remote repository for version control.
The repository must be hosted on GitHub https://github.com/
Rules
The first version of your HTTP server will be a very simple single threaded server: There will only be one thread taking care of everything:
The server must listen on some port like 80, 8080, 8888 or the like.
All TCP servers have the same basic structure. This means that you can start looking at a simple TCP server (like Echo server) that you made in the CODS course.
The first version of the server should send back some static content (always return the same text, like "Hello world"). This version should no attempt to open a file, etc. In this version you do not need to read the request.
Your server must send a HTTP/1.0 response, not HTTP/1.1.
Useful C# classes
Make sure all network connections, etc. are closed properly: Use using or finally statements.
Run your server and use it from an ordinary browser.
Use Microsoft Internet Explorer(Or a browser you feel for) to send the request. Press F12 to open a monitoring window: Find the network like icon, and press the Green record button. Send some requests, and they will be recorded, so that you can check the details later. Very useful for debugging.
In the next version the server should send some dynamic content back to the client, like "You requested /someFile.html". This version should no attempt to open a file, etc.
In this version you must read the request send from the browser to the server - but reading the first line is enough.
The first line should look like GET /someFile.html HTTP/1.1. You must extract the URI (middle) part of the request line (/someFile.html in this case) and include the URI in the response.
Useful C# API
In this version the server should send the contents of the resource (read "file") from the requests URI.
In the previous version of the server you extracted the URI from the request line. Now you must define where on the servers disk to look for this file. The place to start looking is called the RootCatalog.
Some examples
Declare your root catalog like
private static readonly string RootCatalog = "c:/temp";
Useful C# API
Make sure the file stream is closed properly in a using or finally statement.
possible Commit + push to your GitHub repository!
You should unit test your server (and its individual parts) before and after each of the steps in this exercise.
Testing a server is different from the unit testing you done in the SODP classes. To test at server you send a request to the server, and then you assert something about the response:
The project you forked from GitHub contains a Unit Test.
This test is quite hard! It tests a lot of features that your web-server probably does not have at the moment. Don't expect the test to be all-green - expect more red than green!
If you don't like the test to be red, you may make some of the test methods into comments.
possible Commit + push to your GitHub repository!
Now it's time to clean and document your code:
possible Commit + push to your GitHub repository!
The next version of your HTTP server will spin off multiple threads: One request generates one new thread.
The server still accepts request and then creates a new thread to handle the request and send the response.
Advantages: If one client is slow in sending the request it does not block other clients.
Use a thread pool
Useful C# API:
Run the unit test to see that the server still works. VERY IMPORTANT!
possible Commit + push to your GitHub repository!
Do the cleaning and documentation again
possible Commit + push to your GitHub repository!
The HTTP client (browser) needs to be informed about the status of the HTTP response. This is done using the status response header.
http://www.faqs.org/rfcs/rfc1945.html section 6.1 shows the status response headers.
Check the response status codes with your test. You may have to add more test cases.
possible Commit + push to your GitHub repository!
All browsers can show plain HTML files, but most browsers can show other kinds of files as well. Examples: GIF and JPEG files.
Some browsers can call external viewers like Adobe Acrobat Readers for PDF files.
If the browser does not know about the file type it will show a "Where to save this file?" dialog.
The server must inform the client (in the HTTP response) about the content type to make all this work. Content-Type is a header in the HTTP response. http://www.faqs.org/rfcs/rfc1945.html section 10.5
The content type can be inferred from the extension of the file name. Some examples
| Filename extension | Content type |
| html | text/html |
| htm | text/html |
| doc | application/msword |
| gif | image/gif |
| jpg | image/jpeg |
| application/pdf | |
| css | text/css |
| xml | text/xml |
| jar | application/x-java-archive |
The default content type is application/octet-stream. Use it if no other content types are applicable, i.e. if you have a filename without extension or with an "unknown" extension.
More content types (sometimes called media types) can be found on http://www.iana.org/assignments/media-types/
Useful C# APIMake the content type related methods in a separate class (not inside the general HttpServer class). Make a method like
public static String GetContentType(String filename)
When it works you can copy the method to your server.
Check the response status code with unit testing.
possible Commit + push to your GitHub repository!
Until now we've shutdown the HTTP server by typing Ctrl-C in the console window running the server. That is not a very nice way to end a program, especially not if the program needs to do some clean-up before closing.
Ideas for graceful shutdown
When you want to shutdown your HTTP server you start another program (a shutdown client). This program connects to the shutdown port.
To make the server stop while it is waiting on accept() you must do something special:
possible Commit + push to your GitHub repository!
You might also include other headers in the response. Take a look at RFC1945, section 10.
The Content-Length header should be fairly easy ... inspiration.
Maybe some of the other response headers are just as easy?
possible Commit + push to your GitHub repository!
In the present version the server must be started before you execute the unit test.
It would be better if the unit test started the server (in a separate thread), ran the test cases, and finally stopped the server. Fragment of a unit test:
        [ClassInitialize]
        public static void StartServer(TestContext context)
        {
            _server = new HttpServer(Port);
            Task.Factory.StartNew(_server.RunServer);
        }

        [ClassCleanup]
        public static void StopServer()
        {
            _server.Stop();
        }
possible Commit + push to your GitHub repository!
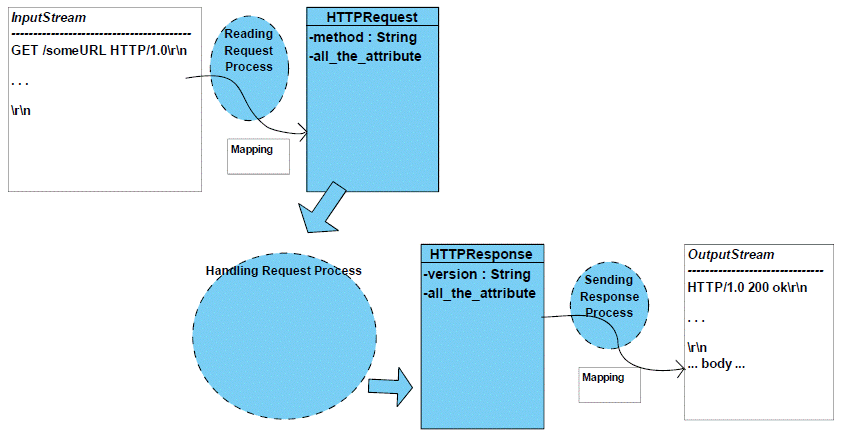
Next step in the refactoring is to let the reading from an input stream build and
initialize an HTTP-Request object and then use this
object for the further handling in the server.
You should also save information for the output in a HTTP-Response object.
Information needed for sending response-lines back to the client (Browser) are
then obtained from the object.
Refactor your system to have Accepting Request, Handling Request and Sending Responses in separate classes (e.g. ReadingRequest, HandlingRequest, SendingResponse)
Put the code for reading the request (i.e. read a request and build the information into an HTTP-Request object) in the ReadingRequest-class and sends response (i.e. retrieve information for the response from an HTTP-Response object) in the SendingResponse-class.
Don't forget to test you server before and after the refactoring.
URL's need encoding and decoding, since lot of characters are not allowed in URL's: space, æ, ø, å, etc.
Example (from a Google search for "Anders Børjesson")
A client (like a browser) automatically encodes the URL before sending it. When your server receives an URL it must be decoded.
Useful C# API
To make the application more easy to setup you need a configuration file. This will make it more easy to move the application from one computer to another and to make it more easy to change the configuration of the application ie. you do not have to change the code and recompile it.
The configuration file could contain following information:
Again, make some experiments outside the HttpServer class before you start to use the configuration file in your server.
If a client send a request to the server without telling which files to get, the server normally send back a welcome file (normally the file named 'index.html').
The server should implement a feature to support this function, e.g. have a default filename if no filename are in the request. An even more advanced feature includes a sequence of file names to use if no file name is found in the request. E.g. first try index.html then index.htm and then index.asp
If a client sends a request to a folder with no filename and with no welcome files, the server should respond with the contents of the catalog including a Hyperlink to the files in the catalog, so the user just need to click on link to get the file.
A reference on how to make HTML links http://www.w3schools.com/html/html_links.asp
In the HTTP protocol you are able to use the Methods GET, PUT, POST, HEAD and some more. You have already implement the GET Method. Look in the description of the HTTP (the RFC http://www.faqs.org/rfcs/rfc1945.html) and see how the requests PUT, POST and HEAD are specified and implement anyone of the methods.
In the current version the connection between filename extensions and content types are "hard coded" in you program text. Move the (extension, content type)-table to a text file - and read that text file when you startup the server.
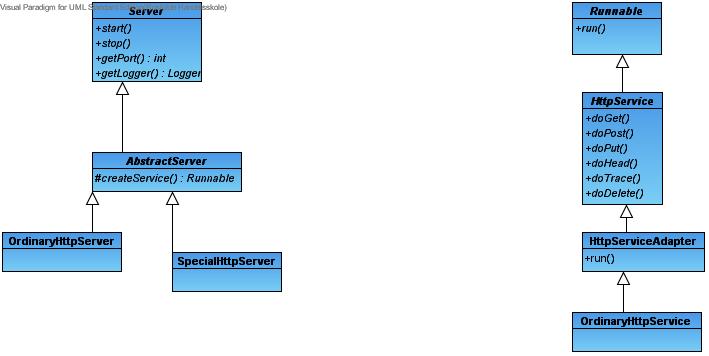
To make use of your code in the future you should refactor your server-code.
The idea is that all what is general are separated in an interface e.g. Server which have been implemented in an abstract class e.g. AbstractServer. Then your HTTP-server could extend the AbstractServer class and minimize its own code because some of the work are already coded in the AbstractServer class. If you now are to implement new servers it will be much easier - and you will later this autumn.